
HeavyLoad Free System Stress Testing Tool for Windows
HeavyLoad is a free and powerful stress testing tool developed by JAM Software. It is designed to push your system’s hardware to its limits by simulating heavy usage on various components like the CPU, RAM, hard disk, and graphics card.
100%
FreeWare
4
System Monitors
Real-Time
Analysis
Features
Discover the powerful tools HeavyLoad offers to test your system’s performance under stress.

Simulates maximum CPU usage to test processor stability and cooling.Helps identify thermal issues.

Allocates large amounts of RAM to test memory performance and limits.Useful for detecting faulty RAM or memory.

Continuously writes and reads data to/from the disk to simulate heavy usage.Helps evaluate disk performance & endurance.

Puts load on the graphics card by rendering complex graphics.Assists in identifying overheating or instability.
Generates network traffic to test bandwidth and connectivity under pressure Great for evaluating.

Runs directly without installation, ideal for quick testing on different systems.No system changes or admin rights.
How HeavyLoad Works
Explanation of How It Stresses System Components
HeavyLoad is designed to push your PC to its limits by generating maximum load on your system’s key hardware components. It simulates demanding usage scenarios to help identify performance bottlenecks, overheating issues, or potential stability problems. Here’s how it targets each component:
- CPU Stress Test: Performs complex calculations using multiple threads to drive CPU usage to 100%.
- Memory Test: Continuously allocates large amounts of RAM to check for memory handling issues.
- Hard Disk Test: Writes and deletes temporary files on your hard drive to test read/write speeds and detect disk-related failures.
- Graphics (GPU) Test: Draws complex graphic patterns to put a load on your GPU (basic stress only, not as extensive as gaming benchmarks).
- Network Load: Transfers data across the network to simulate heavy bandwidth usage (useful in testing network reliability).
These stress tests can run simultaneously or individually, depending on your testing needs.
Different Test Modes Available
HeavyLoad offers a variety of test modes, including:
- CPU Usage Simulation: Puts all CPU cores under full load.
- RAM Fill: Allocates and locks a large portion of RAM to simulate high memory usage.
- Disk Write Test: Continuously writes large files to a specified drive to test disk performance and space handling.
- GPU Load: Simulates graphical stress by drawing moving patterns on screen.
- Network Stress Test: Uses TCP/UDP data packets to simulate network load.
Each of these can be turned on or off independently.
Customization Options
HeavyLoad is highly configurable to suit different testing scenarios. Key customization options include:
- Test Duration: Choose between running the stress test indefinitely or for a specific duration (e.g., 10 minutes, 1 hour).
- Component Selection: Select which system components to stress — you don’t have to run all tests at once.
- Target Drive for Disk Test: Specify the drive where temporary test files will be written.
- CPU Core Utilization: Option to choose how many CPU cores or threads should be stressed.
- Memory Usage Limit: Set the amount of RAM HeavyLoad should consume during testing.
- Start Delay: Useful if you want the test to begin after a short wait (e.g., after logging in or running other programs).
These features make it easy to simulate real-world usage or stress your system under specific conditions.

Download & Installation
Where to Download
To ensure you’re getting a safe and updated version of HeavyLoad, always download it from the official source or a trusted software site:
- Official website: https://heavyload.net/
Avoid downloading from unknown or suspicious third-party sites, as they might bundle the tool with unwanted software.
nstallation Process (Step-by-Step)
- Download the Installer
- Go to the official website and click on the download button for the latest version of HeavyLoad.
- Run the Installer
- Locate the downloaded .exe file and double-click to launch the setup wizard.
- Follow the Setup Wizard
- Accept the license agreement
- Choose the installation directory (or keep default)
- Select additional options (e.g., create desktop shortcut)
- Install the Program
- Click "Install" and wait for the setup to complete.
- Launch HeavyLoad
- After installation, you can start HeavyLoad from the Start menu or desktop shortcut.
Portable Version Usage
HeavyLoad also offers a portable version, which requires no installation and is ideal for IT professionals who want to carry the tool on a USB drive.
- To use the portable version:
- Download the ZIP file version from the official website.
- Extract the contents to a folder (e.g., on your desktop or USB drive).
- No changes will be made to your system registry or settings.
Portable version is perfect for on-the-go diagnostics without leaving traces on the host machine.
System Requirements
To ensure HeavyLoad runs smoothly and performs accurate stress testing, your system must meet the following requirements:
Supported Operating Systems
HeavyLoad is primarily designed for Windows environments. It works well on the following platforms:
- Windows 11 (32-bit & 64-bit)
- Windows 10 (32-bit & 64-bit)
- Windows 8 / 8.1
- Windows 7
- Windows Server 2022
- Windows Server 2019
- Windows Server 2016
- Windows Server 2012 / R2
Minimum Hardware Requirements
Although HeavyLoad doesn’t require high-end specs, stress testing pushes your system to its limits. It’s best to meet or exceed these baseline requirements:
-
Processor (CPU):
Dual-core processor or better (Intel/AMD) -
Memory (RAM):
Minimum: 2 GB Recommended: 4 GB or more for memory stress testing -
Storage (Disk Space):
50 MB free space (for installation) Additional space needed for disk stress tests -
Graphics:
Standard graphics; no special GPU required (unless testing GPU load) -
Display Resolution:
Minimum: 1024x768
User Interface Overview
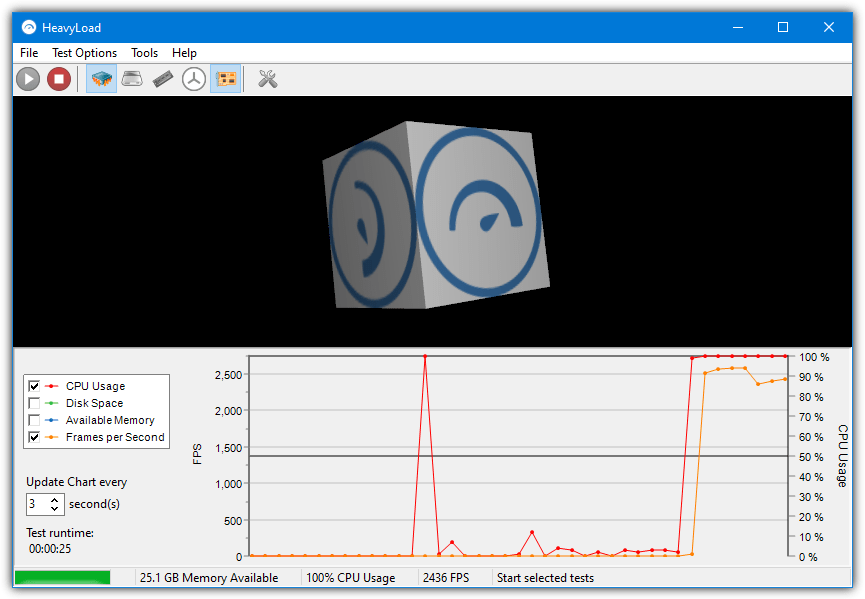
HeavyLoad has a simple, user-friendly interface designed to let users start stress tests quickly and monitor their system performance in real-time. Here’s a breakdown of the main UI elements:
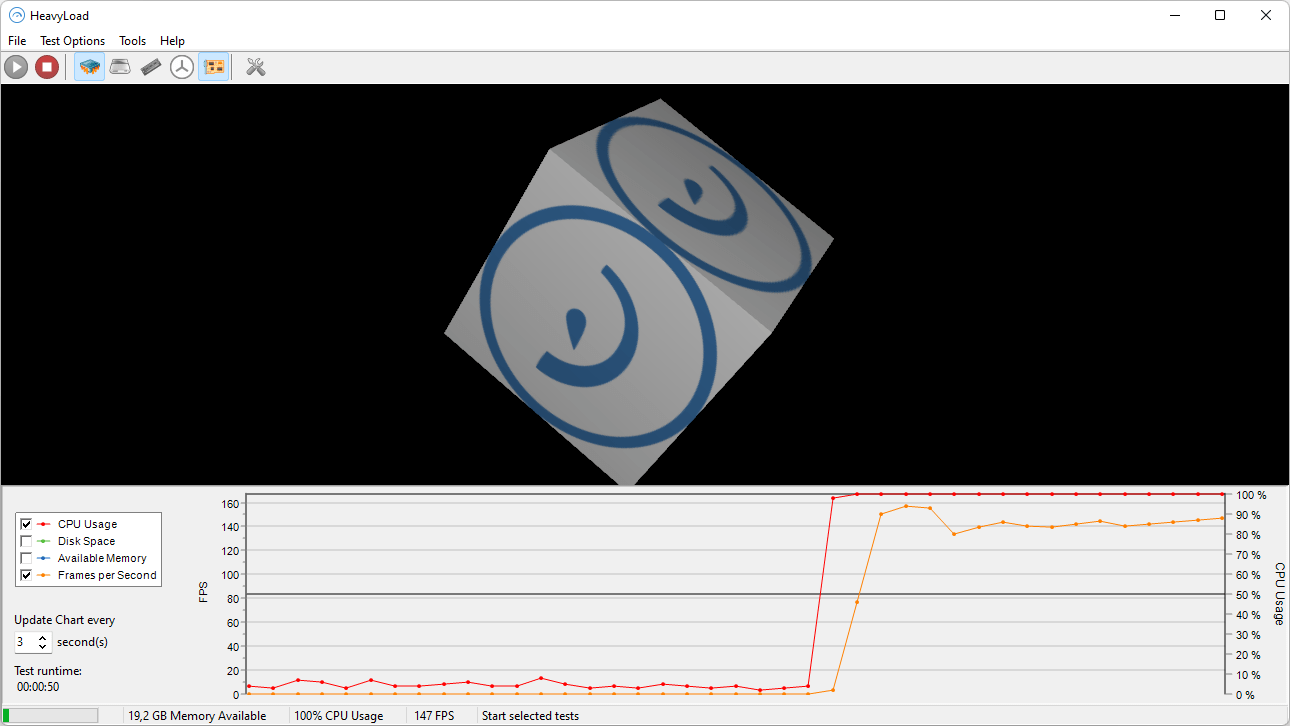
Home Dashboard
The home dashboard is the main screen users see after launching HeavyLoad. It provides:
- A visual representation of system stress, often using colorful graphs.
- Tabs or sections for each component being stressed (CPU, RAM, Disk, etc.).
- A quick snapshot of current system usage, including CPU load, memory usage, and disk activity.
- Easy access to settings and tools without navigating away.
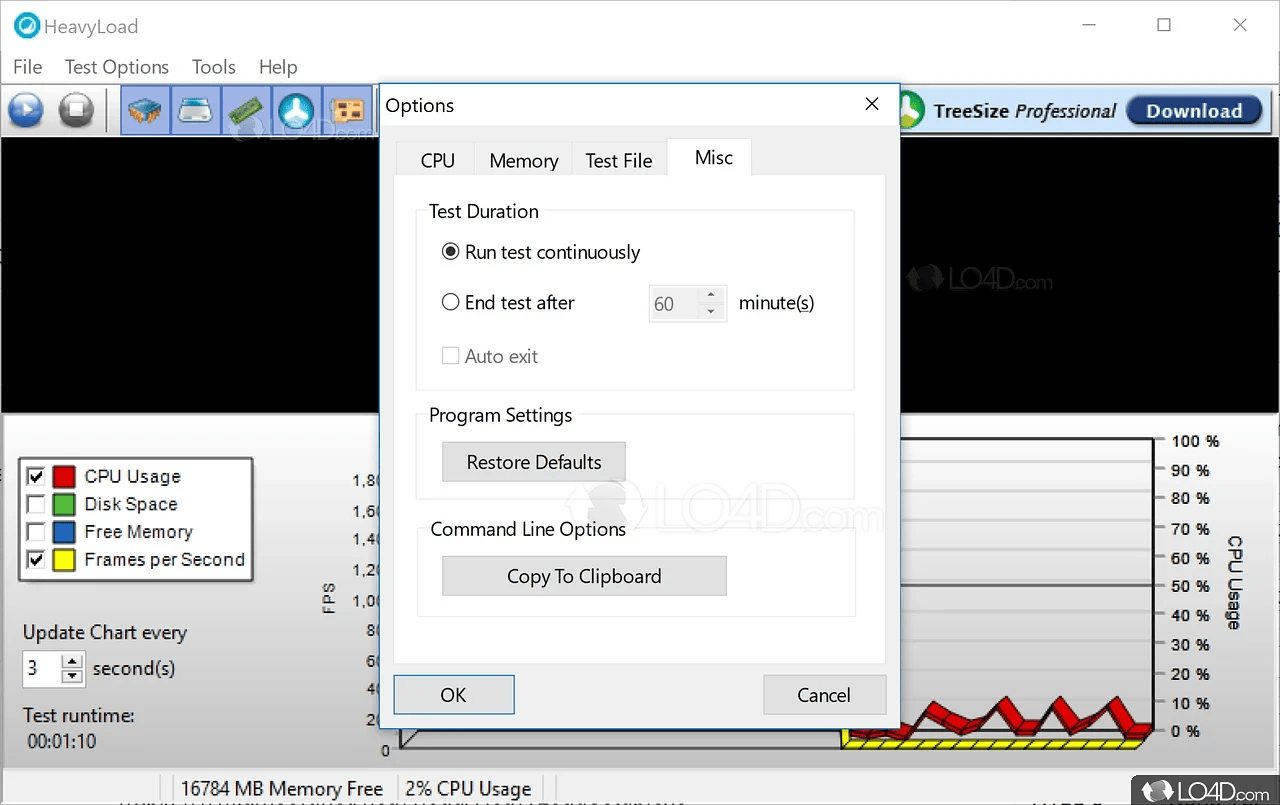
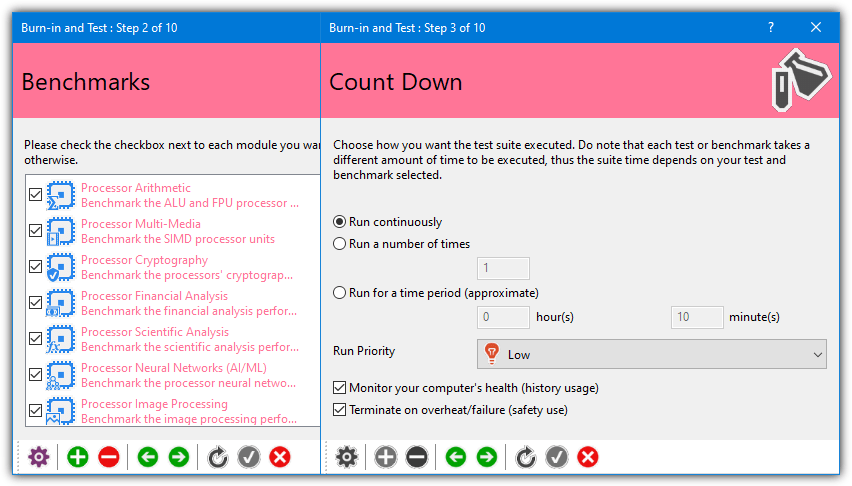
Configuration Options
This section lets users customize the stress test according to their needs. Common configuration options include:
- Selecting which components to stress (CPU, RAM, Disk, GPU, etc.)
- Setting the intensity or duration of each test
- Choosing specific drives for disk write tests
- Enabling or disabling certain features like CPU affinity
- Options to run tests continuously or for a fixed time
These options give users full control over how intense the load is and for how long it runs
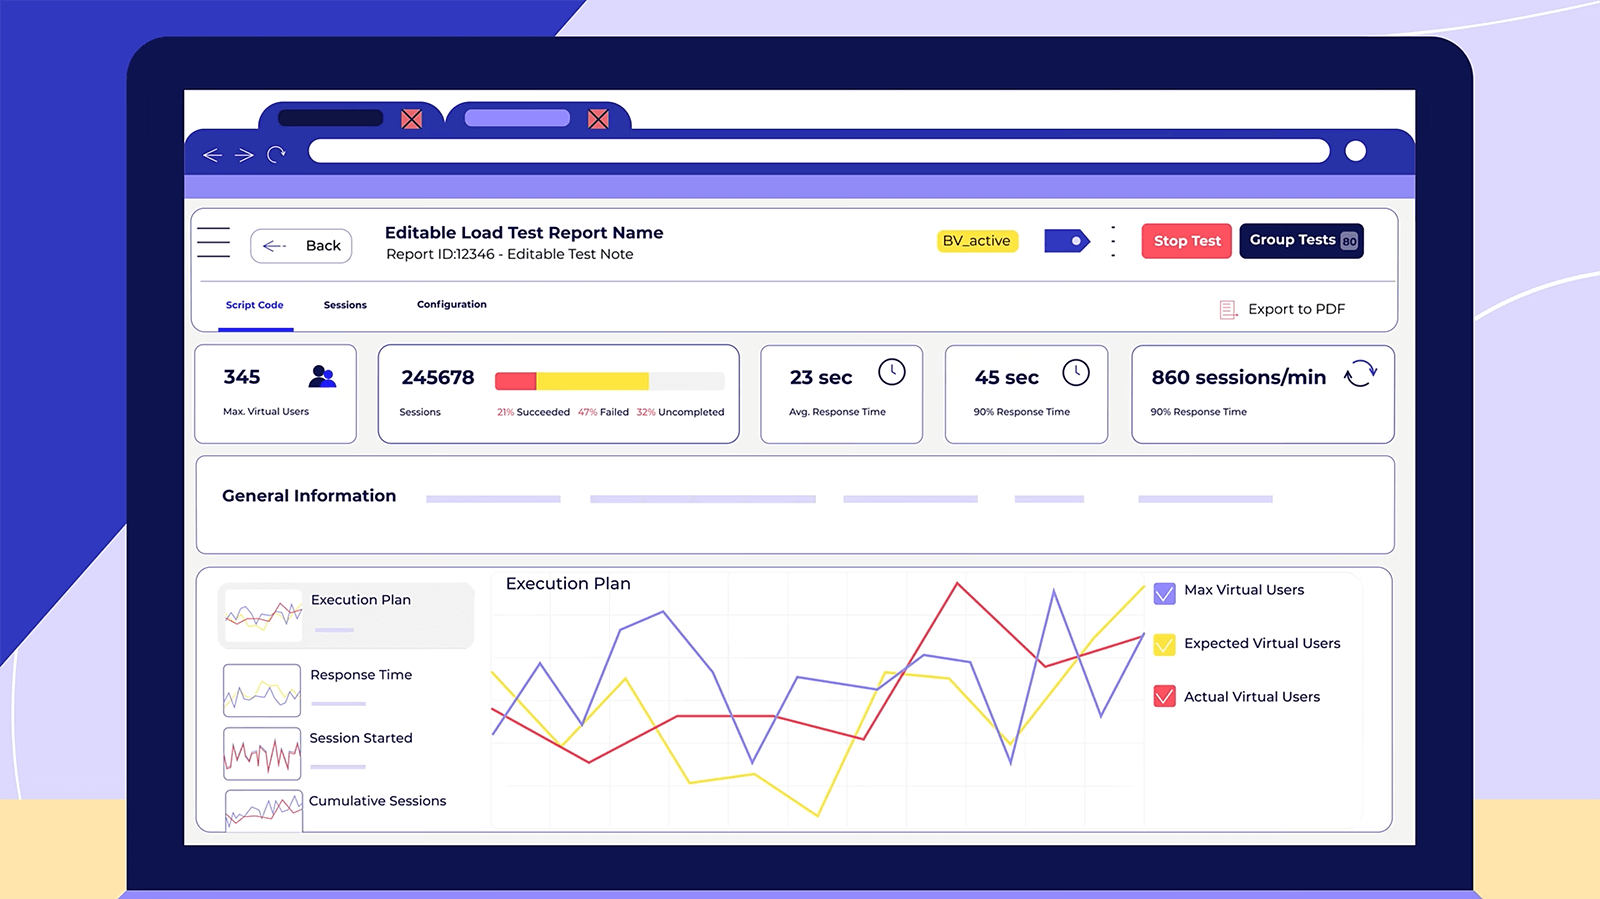
Real-time Performance Indicators
These indicators help users monitor the system while it is under load:
- Live graphs and meters showing CPU usage, memory consumption, disk I/O, and more
- Updates in real time to reflect the current system state
- Helpful for identifying performance bottlenecks or overheating issues
- Color-coded visuals (e.g., red for high usage, green for normal) for quick interpretation
This feedback is crucial for diagnosing how a machine handles stress over time.

Usage Scenarios
Testing System Stability Under Heavy Load
HeavyLoad is commonly used to simulate extreme workloads on a computer to see how well it performs under pressure. By maxing out the CPU, RAM, disk, or GPU, you can observe whether the system crashes, freezes, restarts, or experiences other stability issues. This is especially useful after hardware upgrades, driver updates, or OS installations to ensure everything runs smoothly under stress.

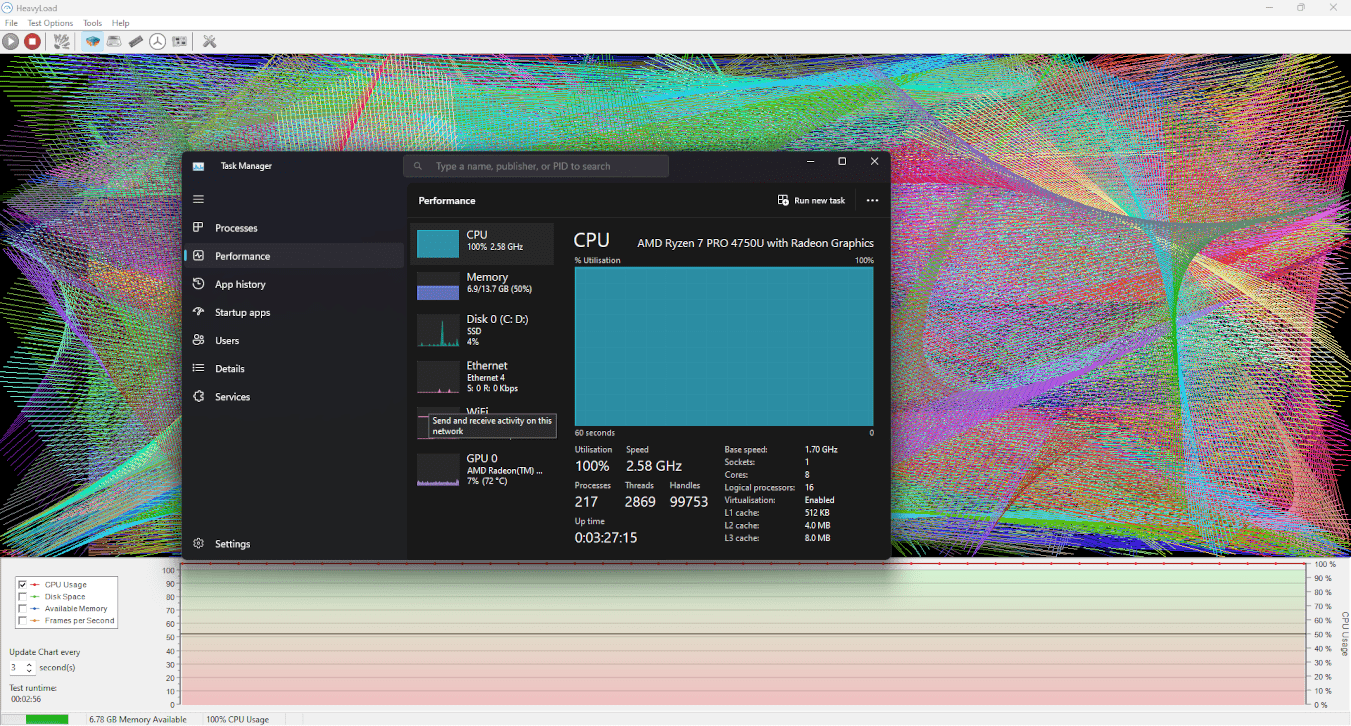
Identifying Thermal Throttling
Thermal throttling occurs when your CPU or GPU gets too hot and automatically reduces performance to cool down. HeavyLoad can push the CPU and GPU to 100% usage, causing heat to build up. Monitoring tools (like HWMonitor or Core Temp) can be used alongside HeavyLoad to see if the system starts throttling due to high temperatures.
Benchmarking New Hardware
Before putting a new PC or server into production, you can use HeavyLoad to benchmark the performance and stress-resilience of the hardware. While it’s not a benchmarking tool in the traditional sense (with scores or rankings), it does help verify that the new hardware can handle maximum workload without issues.
FAQ's
What is HeavyLoad?
HeavyLoad is a free system stress testing tool developed by JAM Software that puts your computer under heavy load to test stability and performance under extreme conditions.
What can I test with HeavyLoad?
You can test CPU, RAM, hard disks, graphics card (via GDI objects), and network performance.
Is HeavyLoad free to use?
Yes, HeavyLoad is completely free for personal and commercial use.
Which operating systems are supported?
HeavyLoad runs on Windows 7, 8, 10, 11, and most Windows Server versions (2008 and above).
Can I use HeavyLoad on a virtual machine (VM)?
Yes, HeavyLoad works on virtual machines and is often used to test virtualized environments.
Is HeavyLoad safe for my system?
Yes, when used properly. However, stress testing can push hardware to its limits, so use caution on systems with poor cooling or hardware issues.
What happens if my system overheats?
If your system lacks proper cooling, it may throttle performance or shut down. Always monitor temperatures during testing.
Does HeavyLoad support multi-core CPUs?
Yes, HeavyLoad can utilize multiple cores and generate high CPU usage across them.
Can I choose which component to stress test?
Yes, you can selectively enable or disable specific test types such as CPU, disk, memory, or GPU.
How long should I run a HeavyLoad test?
A typical stress test duration is between 15 minutes to several hours, depending on what you want to test (e.g., thermal stability vs. system crash testing).
Does HeavyLoad save test logs or reports?
No, HeavyLoad does not generate detailed logs or reports. It’s intended for real-time stress testing rather than benchmarking.
Can I test network performance with HeavyLoad?
Yes, it includes a test to simulate network load by transferring data packets.
Does it test GPU performance like 3D rendering?
Not directly. It uses GDI objects to stress the graphics subsystem but isn’t a GPU benchmark tool like FurMark.
Can I run HeavyLoad from a USB stick?
Yes, there is a portable version available that doesn’t require installation.
Can I damage my PC using HeavyLoad?
Used correctly, no. But on unstable or overheating systems, stress testing may expose hardware issues or cause crashes.
Is administrative access required to run HeavyLoad?
Admin privileges are recommended, especially for disk I/O tests or stress tests on system drives.
Can I schedule tests in HeavyLoad?
No, there is no built-in scheduling feature. For automation, external scripting is needed.
Is there a Linux or macOS version of HeavyLoad?
No, HeavyLoad is only available for Windows systems.
Can I use it to benchmark hardware?
Not exactly. HeavyLoad is designed for stress testing and stability checking, not for comparative performance benchmarking.
Can I stress test external or USB drives?
Yes, you can configure HeavyLoad to test any available drive letter, including external storage.
Schema
HeavyLoad - Free PC Stress Test Tool for Windows
HeavyLoad is a free Windows tool that stress tests CPU, GPU, RAM, and more to check your PC’s stability under heavy load.
Price: Free
Price Currency: $
Operating System: Windows 7, 8, 10 and Windows 11
Application Category: Software
4.8